Showing posts with label Happy Crafting. Show all posts

Sunday, January 23, 2011

Happy Crafting: iPlanner

I am a self proclaimed organizationaholic! I have a smart phone where I keep an up-to-date task list as well as my calendar fully stocked with alarms set as reminders, separate calendars icons for birthdays, work and general. I even have my pantry and linen closet organized and labeled as to where things go. I know- I'm weird.

We also have a calendar that is hanging on our fridge with all of the things that we have planned on it along with post-it notes with things that I would like to plan for each month. Like... going to dinner & using a coupon that will expire that month, going to see a movie that is out and some times even planning trips to visit friends that we have that are out of town. This helps me to put some things into a generic timeline and most of the time we get around to doing a few things on the lists. 

Now, for my third organization and planning tool and today's Happy Crafting project...

A customized planner, because it is customized let's refer to it as the iPlanner. 

I went to an office supply story and picked up a small monthly planner. I bought this one for $3.00 and I'm sure that you could find them anywhere for under $5.00. The key to this project is getting a planner that has the removable plastic cover. 


Then I ransacked my crafting supplies and found what I'd need for this crafty project. The orange circle stencil thing and the lil' circle contraption are the best things I'd bought for scrap booking, card making and other random crafting purposes such as this one. Together they cut perfect circles and it makes a crafters life so much easier! You can also get the stencils in different shapes and styles of alphabet letters and use the lil' circle contraption to cut out those shapes too. I would recommend it to any crafter. 


After I found my materials I wanted to use. I took the planner I bought out of its plastic cover, measured my choice of paper up to it, cut it out and began personalize it.

Keep in mind when you are measuring to cut the new paper using the original planner as a template you need to wrap your new paper around to take the measurement before you cut. Because the planner is thicker when it is folded you need to take measurement when it is folded. If you open the planner flat and trace it, when you cut it and wrap it around the original planner the edges will stick out because it is not long enough.

I used my circle cutter to cut out a picture of Gregorian and I and I also stuck a Life is good sticker on there. I have had this sticker on my planner for the past 2 years and I love it.


After you have finished putting your iPlanner together you just slide it into the plastic cover. First the new cover that you have made  and then the old planner.


... WAAA LAAAA! You are done. Let the planning begin! 


HAPPY CRAFTING!

Wednesday, January 5, 2011

Happy Crafting: The Chair Project

We moved into our first home this past year and like most first time homeowners know... you're house just doesn't come together overnight. Our upstairs living room finally came together with the purchase of a few shelves and the gift of a chair. 

My sister was getting new furniture at her house and I called dibs on a chair that she had. This chair needed a lil' pick-me-up and so my creative wheels started turning- fast! I decided that I would recover the chair. I priced out fabric that we liked that I would use to cover it... but, in the end that fabric was just too expensive. Then, lightbulb! 

I remembered these curtains that I loved from World Market but, we didn't use in our living room because they didn't look good up against the wall color. The base colors were too similar. So, a trip to World Market and $75 dollars later and we were ready to begin, The Chair Project!

Here is the before...


First, I pulled out the staples and nails from the existing fabric that covered the chair. This helped me to understand how the new fabric would be attached to the frame of the chair. 

Pulling all those lil' buggers out took such a long time. I also found lots of fun things when the fabric came off like: chapstick, a sock of my nieces, some polly pockets and $1.87! 


*Note the towel that is under the chair. I would recommend putting something down so... 1. Your floors don't get messed up and 2. The staples/nails that you drop are caught in the same place. 

The hardest part of covering the chair were the arms. This chair had piping on the edge of it and so when I got to that point... I got stuck on how to cover that. I got stuck hard. I think I just stared at the chair for 2 days thinking of what to do. Then it clicked and after a trip to the fabric store we were back in business!

I bought a few yards of fabric piping. Which I found on spools in the "cut by the yard" ribbon section of my fabric store. Then to eliminate unnecessary sewing I used the tops of the curtains, where the curtain rod would normally go, and threaded the piping through. I pinned the piping to keep it snug and sewed a straight stitch running right next to it. 


After that it got easier... I figured out how to make all of the pieces. Now, I just needed to put them together. 

*Note, use a heavy duty staple gun to attach fabric. You will want the extra "punch" of the heavy duty staple gun to keep your fabric tight. Also, DO NOT be afraid of using too much fabric glue to hold fabric in place along with the staples. I used 2 bottles and the best part- it dries clear! 

One arm done... 


Almost there... 


To sew the "seat"of the chair I used 3 fabric pieces, one large piece for the middle and two smaller pieces for the sides. I laid the big piece of the fabric in the middle, pattern side down and tucked it into the back and sides of the "seat". Then I took two smaller pieces, one on each side (pattern side down) and pinned them around the curves of the seat. After it was all pinned, I took the fabric off turned it around to make sure it fit snuggly. Then I tucked and stapled the "seat" into place. 

Alright everyone... we are about to have the big reveal. Are you ready? 


TA-DAAAA!!! 


After finishing the chair I had extra fabric so I cut fabric, sewed it up, stuffed the pillow and then tufted it. I did this because I didn't want to waste the fabric and I thought it would be nice to pull the room together. The tufting was easy and it's a nice lil' touch on the ordinary throw pillow! 


I have never recovered anything before, so I didn't really have a particular order for doing any of it. I just let my creative mind run wild and in the end that worked out just fine! There is a great sense of accomplishment in completing this project. We also saved a lot of money by recovering this chair and using curtains as opposed to upholstery fabric. A chair brand new in a pattern fabric can be anywhere from $150- $400 bucks...yikes! 

I love, love, love the chair and it completes our living room perfectly! 

So, for all you happy crafters looking for a project... get yourself a chair! 


HAPPY CRAFTING! 


Wednesday, November 10, 2010

Happy Crafting: Clothes Pin Photo Wall

My husband and I bought out first home this past summer. We closed in April and then waited 3 long months to move in! In the end it was so worth the wait... I love owning a home and having a place to decorate and organize anyway I want to.

I am a picture-a-holic, admittedly, and any one who really knows me can attest to that. When we moved into our house I wanted to hang picture frames everywhere I could, especially in the hall way that leads to the bedrooms.  I thought it would be like a walk down memory lane every time you walked down the hall. But, Greg wasn't too keen on the idea of having holes in the wall and it kinda would "clutter-up" the place. So I came up with an easy solution to have the pictures I wanted in the hall way with out it looking "cluttered-up" and putting holes in the wall.

Blog friends, I present to you.... A CLOTHES PIN PHOTO WALL!


Ok, so this may not be the first time you have heard about or seen this... but I was impressed with how this turned out that I thought I would share.

Here is what you'd need to create this:
- Clothes pins 
- Paint
- A paint brush or sponge
- News paper
- 3M Command Picture Hanging Strips 
- Level 
- Tape measure 
- Pencil 
- Pictures! 


*I don't have pictures for all of the steps and I'm sorry about that... but you are big kids and super smart so I'm sure you can figure it out!*

1. Using a level and a tape measure mark (with pencil) on the wall a little dot or X to show where you will put the clothes pin. I suggest spacing the marks about 5 to 6 inches (depending on picture size) apart so that the pictures do not over lap when you hang them.

2. After you have decided how many clothes pins you will be hanging on the wall take your paint, paint brush/sponge and number of clothes pins... lay them out on the news paper and paint them. *NOTE: Do not paint on the side that the 3M strip will go on. It will not stick as well and this also gives you a paint free surface to lay the pin to dry.


I suggest waiting 30 to 45 minutes for the clothes pins to dry, so grab a snack and watch a rerun of Friends or The Gilmore Girls that you have saved on your DVR.

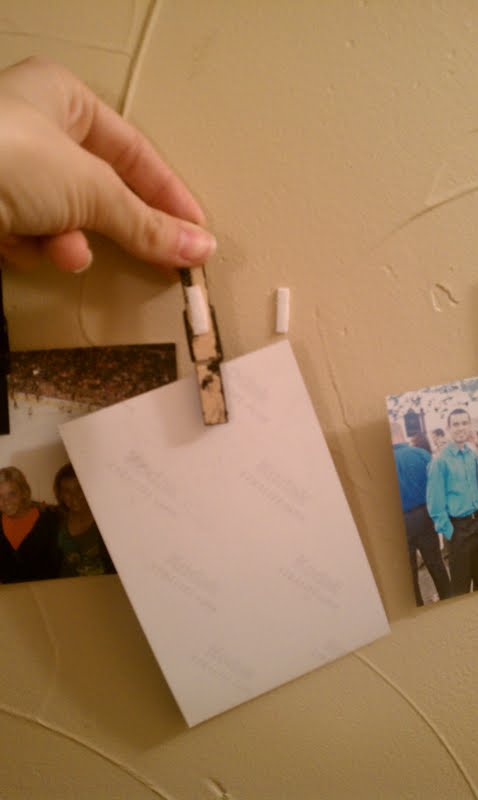
3. When the clothes pins have dried take 2 of the 3M strips and cut them so they become about 1/4 of an inch wide. Peel and stick a piece that you have just cut to each of the non-painted side of the clothes pin. Then stick another piece that you have cut to the spot you marked on the wall earlier.

4. Clip the photos that you have decided to display and clip them into the clothes pins. Then simply match each of them up to the 3M strip piece that you have already stick on the wall.


5. Give yourself a pat on the back for a job well done and enjoy your new,  simple, very affordable (easily under $10- depending on the cost of getting your pics printed), self-made, "un-cluttered" photo wall!

After I hung my pics up I just thought the wall needed a little something more and I found the sign at Target (love that place!) for $15 and I think it works like a charm. For me, it gives the photo wall a title, a statement that the pictures I chose capture.

This idea could be easily adapt to other rooms in your house too. Like the kitchen- you could hang some pins to keep your shopping list, recipes or coupons on. A craft room would be another place that this might come in handy. Here you could display ideas torn from magazines or small swatches of fabric. A child's bedroom would be a fun place to have some pins too! Kids love to display art work that they have created and this would be a great way for them to do that and change it as often as they wanted. Plus, it is such a simple project that they could even help put it up!

HAPPY CRAFTING!